Tuesday, December 8, 2015

Closet Case Files: Distressed Ginger Jean shorts


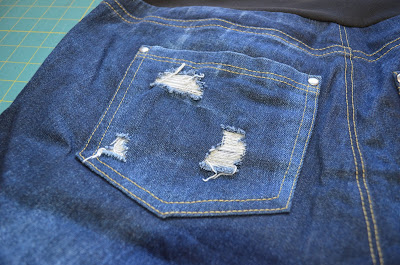
I love sewing my own jeans and I love how much better they fit than rtw, but geez I wish there were more denim options than plain dark denim. So what do you do when you want a pair of light denim or distressed jeans? You play with bleach/sandpaper/scissors!

I made a couple of samples;

Bleach;


Sandblasting (which made no real difference, I used my husbands sandblaster but he has a very fine sand in it so I imagine a coarser sand would work better?);


Sandpaper and bleach;


The pattern is my TNT Ginger Jeans, shortened into above knee shorts. Same adjustments as usual (sz 18, added to inner leg 1", wedge taken from outer leg and extended calf adjustment plus I added a pull on waistband like my last pair)

To get the distressing I did some sandpapering before topstitching, then put the shorts on and marked with chalk the common wear areas. I made a half and half solution of bleach and water in a spray bottle, which I sprayed onto a rag and scrubbed into the fabric (gives a lot more control than just spraying straight onto the fabric). I did it about 5 times, giving it 10-15mins between each application, only dampening the fabric with the bleach solution not saturating it. When I was happy with it I washed them with some vinegar (meant to help stabilise the bleach?) and dried them.


My daughter tells me I did the distressing too low and I agree with her - the fade should have started further up.


I did the cuts with a pair of scissors and tweezers. I wasn't too sure about it to begin with but I'm liking it the more I wear them.


It was a fun project, I wouldn't use the sandpaper again, I don't like the damage it does to the fabric and I doubt I'd do the cuts again either. But I really like how the bleaching went and I'd definitely use that again.

Thursday, December 3, 2015

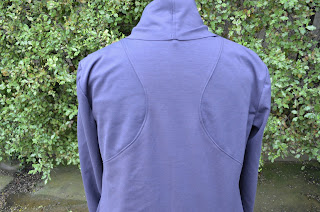
SBCC: 301 Moto Chic Jacket


I loved Heather Lou's version of this jacket and when I realised I have a similar fabric decided to make a version (imitation is the best form of flattery, right...right?)


Fabric is a mystery herringbone from Lincraft. It pressed as if it had some wool content but I imagine it's mostly polyester.
Lining is a sunsilky from the stash. I made the binding for the hem out of it too.
Because my fabric has a fairly soft hand, I interfaced the entire jacket outer with a medium weft interfacing. I also added a back neck facing.


Adjustments;
I made an XL, graded in at the waist to a L.
1" FBA 
1" wide back adjustment
1.5" to the arm width
added 2" to the arm length.
Doubled the back peplum width - when I made it up it just looked too flat and I wanted more gathers!

Its meant to be a cropped jacket, I'm fairly short through the waist so made the length as is and it hits my waistline perfectly. I would prefer to add a couple of inches to the peplum though if I made it again.


The instructions are, well, horrible....they are written as if you were making it out of leather which is fine but if you try to insert the zipper that way its inside out for a fabric jacket....There is a sewalong up now which helps a bit but is also mostly written for leather. I did make a muslin and its fairly obvious how to construct once you've made it. I'll put up with no instructions though if its an interesting pattern and I really do love the shape.


I added some press-studs so I could wear it open - I don't tend to wear any jackets or tops that go up to my neck. I also added the studs to the inner facing as I found mine sagged down. My fabric is fairly thin though, even with it interfaced.

It's an interesting pattern, I like the fit and how the peplum is unlined. Its a pretty version of a moto jacket and would look really nice with a dress too. Even though I look grumpy as hell in these photos I am really happy with it!

Monday, November 30, 2015

Cake 0144: Tiramisu Dress


I'm on a stash busting mission at the moment so sewing through what I have - I got this jersey from Rathdowne Fabrics a year or two ago. Its got great recovery and is a nice medium weight.
I've made this dress a couple of times now but mostly with crappier knits so this dress should *fingers crossed* last a lot longer.

Because this is only a medium weight, I wanted the waistband to have more heft to it so I cut 2 and interfaced them both with a weft interfacing. This gives it a lot more stability and helps it sit smoother when wearing the dress.


I did my same adjustments as last time - the back is a 45, front is a 40D and the waistband/skirt is a 42.5". I extended the sleeves by 1.5" and widen them slightly by about .5".
Except I added to the bust length, this pattern is meant to be sewn without having to add a FBA but I found with me the length through the bodice I just way too short.

I got myself a coverstitch machine this year, talk about a learning experience with it though! I've been using serger thread and had it skipping stitches a lot, I've swapped over to proper poly machine thread now and it seems to be stitching a lot better. I used the coverstitch on my hems and bindings.

I've had a huge sew-jo drop in the last couple of months, this dress is not my best sewing (the waistband doesn't line up perfectly on the side and I should have cut the pockets out with a better stripe placement) but it was nice to just sew without stressing out about the little things!

Wednesday, October 14, 2015

Bridesmaid dress: V.2 finished


This is version 2- I managed to overfit Version 1 plus I ended up hating it so much I never finished lining it or hemming it!

Some quick dress details;

Bodice from Simplicity 4070
Sleeves from Vogue 8943
Skirt is just the width of fabric gathered.
Rigelene boning in the back and front seams.

Adjustments;

Size 18
1" FBA
1" Back width
1" bicep adjustment

Fabric;
Lace from Clear It in Melbourne
Chiffon and Lining from Lincraft

The dress was constructed from directions in Bridal Couture - there is a muslin underlining which is overlayed with the lining then the chiffon - my lace has a purple undertone that I couldn't match with plain chiffon but with the purple lining layered underneath it matches pretty well.


I catch-stitched down all the seams and fell stitched in the lining. First time I've used prick stitching instead of understitching and I'm really happy with it.


I added bra strap holders.


All in all I'm pretty happy with the fit. I do need to do some more tweaking - the back lace section is a bit loose, I should have interfaced or stay stitched it before I started sewing. I have some crumpling in the back waistband also, so it needs to be moved slightly higher and have a sturdier interfacing in it. The fit around the armholes needs to be refined too, I have a bit of excess at the front. But its definitely wearable and I like the shape on me

Thursday, October 1, 2015

Bridesmaid sewing: V.1 - adventures in couture sewing

I feel like a fraud writing couture sewing - do real couture seamstress consider using the serger instead of binding seams? Or think that silk organza is a scratchy itchy seam binding? Or use plastic boning stitched into seams?!

Anyway, I started fitting and sewing the first practise run of the bridesmaid dresses. I'm using Simplicity 4070, its the only pattern I have with a lace overlay which means I don't need to draft anything.


I'm pretty much following the instructions out of the Bridal Couture book so cut everything with big wide seam allowances and marked the stitching lines with wax tracing paper.

I underlined the georgette with muslin which gave it a bit of body and let me catch stitch down the seam allowances. I wanted to add in boning and had a big roll of rigeline in my shelf - I used two strips on either side of each seam except for the very front seams where I only used one. Its smoothed out the bodice nicely. I left it too late to add channels so just stitched it into the seam allowances before they were catch stitched down.


It did originally make the bust seam sit out a bit too far but I found this awesome post on pattern review and went back and unpicked the boning and eased it in and now its sitting perfectly.

I planned on using silk organza to underline the lace but since this lace is fairly stable I didn't need to. This is my second version of the lace - the first I tried using silk organza to bind the seams but didn't like the look or feel so French seamed the lace and then made my own bias binding to finish the neck and armhole seams

Notes to self;
I eased in stay tape to the front top of the bodice but next time I need to be a bit more aggressive with the easing
Either add more boning or interface the underlining - Its not quite stiff enough.
Starch the hell out of the georgette!
Remove all the thread basting - yes it gets hidden but it just looks messy
Iron the rigeline flat first - its bowing the side seams out.

I've just pinned the skirt on here - I want to change the pleats to gathers (I figure it will be more flattering to C's pregnant belly).


I'm hoping to get the skirt finished and insert the zipper this weekend.

Friday, September 25, 2015

Bridesmaid dress sewing

My best friend is getting married in March next year, myself and her sister are the bridesmaids. We'd planned on getting a custom made dress from a website overseas but the good/bad news is her sister has just found out she's pregnant (that's good), which means with a changing shape the chance of the dress fitting properly is not likely as she'll be just over 8mths at the wedding (that's bad, lol).

So, I offered to make the dresses, which I'm actually excited about but have a big learning curve since I've very rarely sewn with lace or chiffon and have never fitted a pregnant belly before.

The current dress plan is a princess line bodice with a lace overlay and sleeves. The skirt will be a chiffon pleated one. I figure I'll make a couple of mock-ups, not only to check the fit but to play with the technique. I've got 2 of Claire Shaeffer's books (Couture sewing and Bridal Couture), so I'll be reading up on sewing with lace. Pattern wise, I have her Vogue 8943 which is different to how I want the dresses made but will give me a good idea on finish and overlay

Here's the inspiration photos, the skirt is like the top photo and then add sleeves like the second photo with the lace overlay only being on the bodice. It will have more of a scooped neckline at the front.


She would like buttons down the back like in this pic, I'm wondering if I make it like a placket that would hide the zipper, still have to play around with that idea though. It may be easier to add a side zipper and have the back non-functioning but geez I hate side zippers! I like the idea that the zipper would be completely hidden and potentially the skirt overlay and back buttons would be not attached to the dress underlay for a couple of inches on either side and then do up and cover the zipper....not sure if its possible of how hard it would be to finish it neatly.


I figure for C (the pregnant bridesmaid), I'll fit her a few weeks beforehand and make her dress with extra wide seam allowances and hem and then fit her properly the weekend before. I'm figuring that fitting a belly would be similar to an FBA? More length and width to fit over the bump?

If anyone has suggestions for books, patterns or blogs to check please let me know!

Wednesday, September 23, 2015

McCalls 7199: Drape jacket


I am a sucker for a drapy knit cardi and McCalls really do seem to do the best ones. The sizing is pretty predictable though, I always have to size down a few sizes (I think I'm a 20 or a 22 on the size chart and I made a sz16 here), the arms are always too short and way too tight. There's something a little funky going on at the back of the armhole, I want to wash it a few times though and see if its the fabric being a bit stiff or if I need to trim some off next time.

Adjustments;


  • Size 16
  • 2" FBA
  • 3" bicep width
  • 1" to arm length
  • 1" to armscye height
  • 1" back width
  • 1" to hips


I like the seam lines on the back especially and I really want to make a contrasting version eventually.


I read in the only review on patternreview that the weight of the facings dragged the top forward when wearing so I decided to leave the facings out and left the front edge unhemmed. This meant I stitched the back neck seam the other way from the instructions so the seam would be hidden


The fabric is a purple/grey ponte knit from Spotlight


I wore this to work this week and its one of those tops that looks so much nicer when you are moving around instead of standing still, it has great drape and I love the seam lines. I thought about making it look more fitted by taking it in at the back by adding a centre backs seam but I have been way over-fitting my clothes lately and need to just take a chill-pill and relax so I left it long and swingy.