Wednesday, September 16, 2015

Closet Case Files: Blue gingers


Another pair of pull-on ginger jeans -

Same adjustments as last time, main difference is I found they were hitching up at the back knees a bit which was because I had shaped the outer leg on the back pattern piece and it must have added extra length so the back pattern piece was about 1" longer than the front causing the buckling. Since fixing that they are hanging a lot straighter now.


The fabric is a lovely stretchy reversible denim from Rathdowne fabrics, with blue on the top and black underneath. Thread is Guttermann  #392 upholstery thread and the rivets are ones from etsy

I saved a blog post from a while ago by meggipeg - I really liked her jeans and the quilting on them so in tribute to them (which sounds so much nicer than saying I completely copied her!!) I quilted a section on my back pockets, using some scraps I had of fleece to beef them up with. I thought about using batting but figured the fleece wouldn't shed or unravel


I read another post the other day from notes of a mad housewife about sewing the back crotch seam up so the seam is exactly in the centre of the pants, not to the side like it is if you flat fell or even faux flat fell the seam. I tried the first method with the zig zag and it worked really well, I should have trimmed down my seam allowance from 5/8" to 3/8" though (I get a bit mixed up with the whole imperial measurement thing sometimes!) and next time I think I'll run a line of basting stiches along the fold lines as I found it a bit hard to measure it exactly evenly when you fold it over.


Gotta love an elastic waistband!


Wednesday, September 9, 2015

Grainline Studio 16001: Cascade Coat take 2


Its hard to show how much I love this coat in photos - I made it a couple of months ago and have been wearing it non-stop (apologies for the cat hair all over it, as soon as I put it down the cat is on it sleeping!)

I learnt a fair bit making the first version and therefore changed a few things on this version. The adjustments are the same;

  • I made View A with the hood
  • Size 14 through the shoulders graded to a sz 16 at the hips
  • Narrowed the shoulders by a further 1/2"
  • Added front princess seams from Simplicity 2446 with the equivalent of a 1.5" FBA
  • Changed the armscye  by also using S2446
  • Added to the upper sleeve width and to the sleeve cap (approx. 2" to each)
  • Wide back adjustment 1.5"
  • Added a centre back seam
  • Interfaced the fronts


  • Plus;
  • Took out some size of the hood (next time I'll be making it smaller again)
  • Added about 3" in length to the body and about 1.5" to the sleeves
  •  Catch-stitched down all the hem facings, I found on the first version they tend to flip out and not sit right, so I catch-stitched these down and then hand stitched down the hems on the sleeves and body. Its makes for a lot nicer coat to wear and didn't really take any more time.

  • I used a heavier poly coating this time and the coat sewed up so much nicer and is a lot nicer to wear too. The hood doesn't drag it back as much and its just so more wearable.


    I made my own toggles again, the half circle toggles are a lot harder to sew on so I made these into a triangle shape. I made my own leather cording too, just by cutting strips, doubling them over and stitching. I used pre-cut leather strings last time and I found they have stretched out a lot and they don't have the heft and secure feeling that these do.


    I used a brass zipper I salvaged out of a jacket from the op-shop (the same jacket I used to harvest all the leather from for the toggles)


    Lining is a green rayon from Great Nan-in law's stash. I used plain black for the hood and pocket linings incase it shows.


    This has been my main jacket so far this winter, and I bought some really nice plaid wool blend coating from Lincraft for next years version!

    Wednesday, September 2, 2015

    Recycle Runway Challenge: Part 3 - Runway

    This is Part 3 (Part 1, Part 2)


    My daughter agreed to be my model, we went with dark stockings and Doc Martens to finish off the outfit. I did her makeup and hair (I back-combed and teased her fringe up following the tutorial here)

    They had a proper photographer, unfortunately the next two photos are the only ones they got of Amber (and I have no idea what's happening with her face in the last one, she looks kind of terrified!), but you can see the lighting and the runway - they projected our starting garments up on the back wall while our models were walking


    Overall thoughts; I found the challenge really fun, a nice break from normal sewing. I'm not sure if I would enter again, the night went forever (5hours standing the whole time) plus Amber said she wouldn't model for me again (same reason, the whole night just dragged on).

    I didn't place, as far as I can tell the judges wanted the outfits turned completely upside down, ie - jackets into skirts, jeans into tops.

    If you are interested, the library posted all the outfits on their facebook page


    Time to get back to some normal sewing!!

    Friday, August 21, 2015

    Recycle Runway Challenge - Part 2: Refashion - Blazer

    This post follows on from part 1

    The Blazer;
    
    Jacket - Before

    Jacket - After

    I've been a bit obsessed with antique military style jackets, but haven't been able to justify making one yet so this seemed like a good excuse to play with the idea.

    I cut off about 6" in length and removed the lining. Fitted it by taking in the side seams and princess seams which also narrowed the shoulders. Straightened the front of the jacket by removing the lapels and added a button band. Shaped the hem to add the points and used red felt to overlay the collar and the sleeves. Added shoulder epaulets made from the welt pockets and red piping to the hem.


    I managed to cover the old buttonholes up on the front with braid but you can see where I zig-zagged them closed on the inside.


    I used a hem facing - seemed the easiest way to finish off the shaped hem and then I handstitched down the lining.


    The chinese knots are made from braid which was fused then hand stitched to the front of the jacket. The buttons were from my stash.


    I was really impressed with the shoulders and sleeve cap supports inside the jacket - I've been annoyed at how mine have been collapsing and after looking at this I have been way undersupporting the sleeve cap. This had a layer of horsehair (or hessian?) and then another layer of a thick wool felt that was doubled over and stitched to the shoulder pad.


    The front button band was too thick to try and sew buttonholes so I use press studs. Mine have always looked crappy but this time I followed this video of Susan Khaljie's, I used 2 strands of upholstery thread which had been waxed and they turned out pretty damn good if I do say so myself!

     
    The only thing I wish I'd done differently is make this to fit me, not the daughter!
     

    Thursday, August 20, 2015

    Recycled Runway Challenge: Part 1 - Refashion skirt and shirt

    This ended up being a huge post so I've split in into 3 parts


    Our local library runs a sewing competition each year, the idea is that you get a bag of 2nd hand clothing and have to refashion it into an item of clothing or outfit.
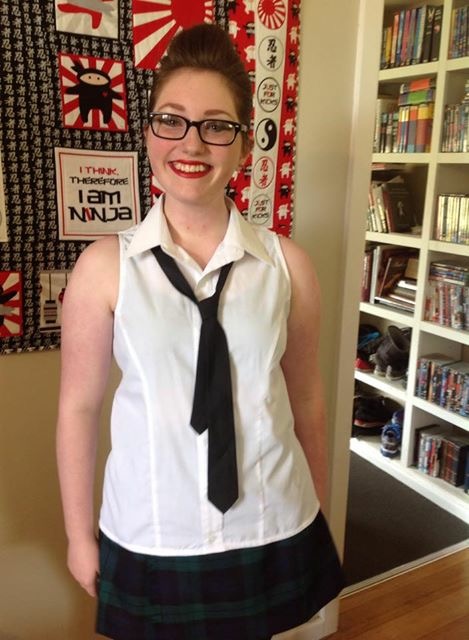
    In my bag of clothes I got a kilt, 2 shirts and a blazer. After a lot of sketches and googling images I decided on a military/punk look (though my daughter reckons it looks like a weird school uniform!) and managed to convince the daughter to model for me.

    The Kilt

    Before
    After
    This was a pretty basic refashion - All I did was shorten it and removed about 3" of the front overlay plus moved the buckles. The fabric is a scratchy wool that pressed like a dream and completely hides the hand stitched hem.


    The Shirt

    Before - Shirt 1

    Before - Shirt 2
     
    After - front
     
    After - back

    Shirt 1 - Cut off the sleeves, added princess seams to the front and back, shaped the hem, used the fabric from the sleeves to make an overlay for the back with the eyelets in it.


    I used the shirt 2 as bias binding to finish the arm openings and the hem.


    Most of the time taken on this was in the fitting, I pinned out the princess seams on Amber and had to refit them a couple of times. The back overlay I used muslin pinned on to get the right shape and fit then cut them out, interfacing the inside facing where the rivets are attached.


    The fabric is a poly blend so it was really hard to get a smooth press with it, it still looks a bit wrinkly.

    We did a trial outfit run and after seeing it on her I shortened the hem another 2".