Tuesday, May 28, 2013

Ivy's bunting quilt


I've seen a few of these bunting quilts lately, I really like them and after making this one I'm sold! I used the Melly & Me Bunting Quilt pattern and the fabrics are from the Little Kukla range by Robert Kaufmann.


I made it for my friends daughter so pieced her name in the back, it adds a nice personal touch that I really like.


I made the templates for the triangles up out of template plastic from spotlight and the purple background is a Prima cotton from Spotlight as well.

 
It went together really quickly and is a really good use of fabric, I only got 1/2 yard cuts of the 5 fabrics and I have enough leftover for a cot quilt and scraps.
I borrowed my next door neighbours clothesline for the pics, thanks Sheree! (and gee I need to put a hairdye through my hair, lol!)

Friday, May 24, 2013

Tutorial: Sewaholic 1302 Tofino Pants Pockets

The first thing my daughter requested when I made her these pants were some pockets. These were quite simple to add on and I thought I'd show how I did it;

Firstly, get the side pattern piece


Then work out where you'd like the top of the pocket to fall, we went with 6" from the top of the pattern piece and how deep you'd like the pockets, ours are 8" deep.


Next, put some tracing paper over the pattern and trace the pocket out, adding 1.5cm seam allowance to the bottom and 1" for a fold over to the top. I sloped the top to add some interest but you don't need to do that. Don't forget to add grain lines and notches to the pocket pattern!


Cut out the pockets, turn over and interface the top 1.5-2" for some added stability to the pocket opening.


Finish the top and bottom of the pocket (I serged it)


Then turn under the seam allowances on the top and bottom and press. Top stitch the top of the pocket.


Line up the pocket using the notches and then baste either side of the pocket and top stitch the bottom of the pocket.


Now continue with the pattern instructions and add your piping.


And finish your pants!


Hope that was clear enough and you enjoy some pockets on your Tofino pants :)

Thursday, May 23, 2013

Sewaholic 1302: Tofino pants with pockets!


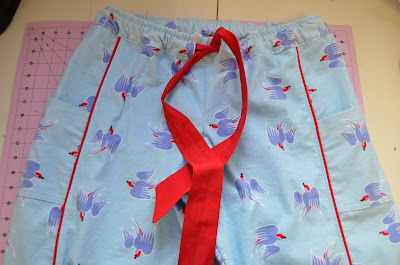
These ones are for my daughter, they're a sz12 with the front crotch scooped out and the hem shortened by 4". The material is flannelette from spotlight and some red quilting cotton I had that matched the flannel pretty close.

I added pockets to the pants (tutorial coming tomorrow!) perfect size for phone/ipod when you're lounging around on the weekend.


I learnt something when I made my pair, you don't need the elastic that tight, the tie works a bit like a drawstring so you can get away with the elastic a lot looser than you might normally.


Anyway they turned out really cute, they fit her fine and she likes them - win! Plus I cleared more of my stash out!

Tuesday, May 21, 2013

Sewaholic 1302: Tofino pants


I was lucky enough to get picked to pattern test these (I am such a fan girl, I was so excited to get that email!). They are a pajama/lounging pant with an elastic waist and side panels that have optional piping on them. I ran out of satin for the piping so only put piping on the front seam.

I made a size 16 with about 1" added to the inner seam on the back and front legs. They are generously cut though and easy to adjust with the elastic waist.
The only thing to note is the side pattern piece stays the same for all the sizes so you don't see as much of the piping as you would in the smaller sizes, next version I think I'll take an inch from each of the front and back pieces and add them to the side pattern piece.


I did a 3 step zig zag around the top of the waistband to keep the elastic from twisting. I love the waistband tie, its nice and long!


The fabric is a vintage rayon I bought a couple of years ago, I got it on ebay and its moderately faded out, enough so that I didn't want to use it on a dress but its perfect for these pants.

I like how these are cut for a slimmer fit through the hips and waist, its still comfortable and doesn't have the bulk that you sometimes get with an elastic waist.


Saturday, May 18, 2013

Cake 0169: Pavlova Top


I liked this pattern when it first came out but it was Heathers version that pushed me over the edge to make it! I really like it tied with the neckline lower and the look of it open as a draped cardigan.

This is a sz 45 but I took the side seams in by nearly an inch under the arms especially. Next time I'm cutting out a 45 on the back and a 40 on the front which is what I do for the Tiramisu dress. I copied Heathers idea and rounded off the back flap too as I'll be mostly wearing it over pants. Be aware that it is pretty short, I wore it out today with a singlet underneath because I don't have any pants high enough waisted.

Fabric is purple bamboo rayon from fabric.com. Its a funny colour, looks blue in bright light and purple in darker light. Its just gorgeous, has great recovery and feels so soft. Next time I order from them I'm getting more of it!

The lapped seam had me scratching my head until I started doing it and then it all came together.


I really like it left open as a cardigan too so if I don't wear it much as a top I'm cutting the ties off, I did have a think about how you could make the ties removable (press studs? zipper? tied on somehow?) because that would be pretty cool! But everything I thought of either wouldn't be strong enough or would make it too stiff.

Saturday, May 11, 2013

Burdastyle Sewing Handbook: Bag


My poor handbag is falling to pieces and I can't find anything I like in the stores at the moment so thought I'd have a go at making a bag. This is the pattern from the Burdastyle handbook, its the main version of the bag with a couple of changes like inside pockets and different straps.


I had fabric leftover from my rose trench coat so first made an underlined pencil skirt....... which bagged out and looked terrible so I unpicked it and remade it as a lined pencil skirt....which fitted badly enough I didn't even hem it. So it was oddly satisfying chopping it up for this bag! I reused the original skirt lining too as the bag lining.


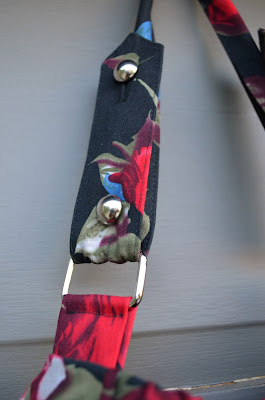
The straps were originally sleeve bands for the trench coat which I left off so it was nice to use them for the straps since I'd already done bound buttonholes in them. The silver buttons are out of my stash.

 
Because I was using a thinish cotton sateen for the bag I interfaced it and also used fusible fleece on the lining to give it a bit of thickness and strength. Haven't used fusible fleece before but it went on really easily and adds a bit of heft to the bag without making it too stiff.

 
I added a couple of open pockets to the inside for my iphone and a magnetic closure. It would have been nice to add a zipper to the bag and a inside zippered pocket too but it hurt my head too much thinking about it so went the easy way! Surprisingly Spotlight had a decent range of bag making notions, its where I got the d-rings and the magnetic closure from.

 
I'm still a sucker for a nice leather handbag, but this cost next to nothing (about $10 all up for the fusible fleece and the notions) and its a lot nicer than what I've been using. I do think its too deep though and not wide enough, I didn't gather the top of it as much as the pattern says because I wouldn't have been able to fit my wallet in. Next version will be wider by about 2" and lower by about 2" with a padded ipad pocket inside and there will be a next one, I really enjoyed making this!

Tuesday, May 7, 2013

Style Arc: Sailor Sue Palazzo pants


I'm really liking pull-on pants at the moment, they are just so comfy to wear at work. These are meant  to be made in a knit but since I'm still stash busting I used some bengaline I had leftover.

These are a sz20 with width added to the inner leg seams and I added on a waistband. Not sure if they look better with the waistband but I like the extra thickness around my hips.

 
I'm counting these as a wearable muslin, I had to adjust the front crotch length more than usual. The pic on the left is my usual adjustments and on the right after I took out a 2cm wedge at the centre, grading out to nothing at the side seams.


The waistband needs to be a bit tighter, its slightly too loose and I'd like to add some patch pockets to the front too. I have some nice black bengaline in line for the next pair, I reckon they'd be really nice in a ponte as well.

I really like these, the shape of the leg is wide without being shapeless and I feel like it balances me out a lot more than a tighter straight cut leg like the Wendy pant.

Thursday, May 2, 2013

Robert Kaufman: I am Ninja quilt


I have a family who loves Karate, we all train each week and love it!  When I first saw this pattern I was planning on making it for my daughter until my husband saw it and really liked it (I have a blue colourway version planned for her!).

 
The pattern is a free download from the Robert Kaufman website and I got the fabric from etsy, though Hawthorne threads is stocking it all now too. The amounts given in the pattern are quite generous, I have about half of the kanji and red ninja print leftover. Also, the pattern doesn't differentiate between directions for cutting out the red ninja and black kanji print so if you want the background all to run the same way keep an eye on it, I only cut as I needed it to help me get it all going the same direction.

 
Its a very easy quilt to make, I used basting spray because I find straight line quilting shifts a bit on me and the spray helps keep it all together. I quilted 1/4" on either side of the seamlines around most of the shapes, changing threads colours to help blend it into the background.

 
I hung the quilt using this tutorial and really like it, it gives the wall a real texture compared to just hanging a painting.