Thursday, October 3, 2013

Lolita Patterns 3013: Sugar Plum


I was lucky enough to pattern test this dress and I gotta say, I love it! I've always admired this type of dress that looks like a skirt/blouse combo but could never find a RTW one that fit and always imagined that fitting one would be a nightmare. This came together really easily though and I had to make minimal fit adjustments. Lolita Patterns have a different sloper for the larger sizes rather than just grading up a small size and it really does make a difference.

I made a Sz18 with the waist graded into a sz16. I still had to do a 1"FBA and I added 1" to the back width but the shoulders fit perfectly and I think if you were a D cup (I'm an F), the bust would have been perfect. I rotated most of the fba into a side dart and the rest into the under bust pleat. The underbust pleat was giving me grief when I first did it, I had it pressed towards the side and as soon as I pressed it the other way towards the front it sat beautifully!

I found the sleeves nice and generous without being too puffy or sticking out and for once I didn't need to do a bicep width adjustment!

 I used a nice Japanese cotton Lawn from Spotlight for the blouse and a Ponte knit from my stash for the skirt. I never wear woven tops so I was pleasantly surprised at how comfy they can be, not as much movement as a knit but not too bad all in all.
 
  
I did do a couple of design changes, I just can't seem to help myself! There's meant to be a zip in the back but I found when I muslined it up that I could just pull it on and off so I left the zip out. The skirt has in seam pockets too but they gaped a bit so I decided to leave them off too.
The original neckline is a high one so I changed it to more of a V-neck which I find more comfortable. Finally, the blouse is meant to be lined but my cotton lawn was thick enough it didn't need to be lined so I made some self fabric bias binding and finished it around the neckline and sleeves with that and just serged the rest of the seams.

It's such a pretty dress with the neck ruffles, I finished them with a rolled hem on my serger. First time I've done that and I am so impressed with how it looks! The buttons have been sitting in my stash for a couple of years and it was so nice to finally use them!

I'm really impressed with the dress, the fit and the construction/instructions was very nice, what I'd class as a higher-end rtw finish which is what I always strive to achieve. I can't wait to see what Lolita patterns comes out with next!

Thursday, September 12, 2013

Vogue 8940: Mens Peacoat


I've never sewn for my husband, he's very much a jeans and t-shirts man. However he doesn't have any coats and when I saw the new Vogue patterns I scooped this one up. It's a nice simple peacoat with some cool details.


The fabric is a navy coating I picked up from Spotlight on clearance. It's very soft and sewed up beautifully, the colour is true in the top 4 photos (the detail pics are a bit washed out looking). Lining is Sunsilky from Lincraft and the buttons were from there too.


I followed the instructions all the way through (for once!), they are very similar to the RTW sewalong with interfacing on the front, side, back yoke, collars and facings. The lining is semi-bagged with the hems being hand sewn. I actually enjoyed the control this gave me over how well it all fit together. It has inseam pockets at the front and a welt pocket inside.


I'm still disappointed in the inside welt pocket. I managed to sew the welts on the wrong way around and had already cut the slit in the facing before I realised.......plus I didn't have enough fabric to recut the front facing and of course Spotlight had sold out of it. So it was carefully unpicked and resewn but you can see some pulling in the lining and its a bit uneven so I'm still not showing any close ups, lets look at the nice notched collar instead!


Fit wise I cut a sz42 which matched his measurements. I muslined it up and had to add width in the arms and the upper back. I remuslined all the changes and then cut the main fabric. Once it was sewn up I got him to try it on and it was massive so it was all unpicked and recut smaller. The final product is a sz 42 with a 2" broad back adjustment and a 2" bicep width adjustment. The chest and length are all straight from the pattern and fit him fine (he's 5'11"). If/when I make it again I'll be adding a little to the forearms and to the pocket opening width (I always tell him he has bear paws not hands so the pocket openings are a bit too small)


Each time I do a decent size broad back measurement I usually gather the back shoulder seam and ease it into the front, this tends to make the upper back creep forward at the back of the arms. Because this jacket also has a dropped front shoulder seam it seemed to exaggerate this so I put in a topstitched pleat instead of the gathers which made it sit a lot nicer (pleated is on the left, gathered is on the right)


I did flat piping around the facings. I'd been given a big bag of my hubbies late Grandfathers ties so I used one of them to make bias strips out of for the piping. This worked really well and there was enough fabric in the tie to make the piping and the welts for the inside pocket.


Speaking of the facing, the pattern doesn't include a back facing so I drafted one. It also doesn't include a jump pleat in the back lining. Not sure if this is normal in men's jackets?? I added a 1" jump pleat anyway.


I did notice the pattern asks you to cut 2 inside pocket lining pieces but you only need one (only mistake I found in the pattern).

All in all, I'm really happy with it. I wanted it to look casual but neat and I think it does, best of all it fits him and he likes it!

Tuesday, September 10, 2013

Lekala 4163: Knit jacket


After the wadder that was Vogue 1364 I downloaded this pattern to give it a go. It has all the things that I've learnt to look for in a knit jacket pattern, cut high at the back and with a waist tie to give some definition.
I used the rest of the blue ponte I picked up at the last Lincraft sale. Its a medium weight ponte that doesn't wear too badly, I stock up on it and the knit interfacing when the big 50% off sale is on each year.


I made a 1" FBA which was rotated into the front folds and a 1" arm width adjustment. I'm really happy with how it fits, Lekala has been a little hit and miss for me but I sent off my exact measurements for this one and its spot on. I've had trouble in the past because they go off the full bust not the high bust which is a problem if you normally have to do a FBA because the shoulders end up too wide and the armscye is the wrong angle. But I think maybe because this pattern is so close fitting (its got either none or slightly negative ease) the shoulders fit perfectly and I needed to do a FBA anyway.

 
The sleeves are a two piece sleeve which fit really well. I have found the ties pull the side seams forward and pull at the back a bit too but its not a major deal. The ties and front facing are interfaced and I'm not sure I'd bother interfacing the ties if I made it again.
 
I should mention I got this pattern from the new English site. Its a lot easier to navigate and download from than the original Russian site. The patterns don't come standard with seam allowances but you can click to have them added at checkout.

Wednesday, September 4, 2013

Megan Nielsen 2205: Virginia Leggings


I was lucky enough to get to pattern test these leggings! Because I would have had to grade them up a couple of sizes for me I thought I would make a pair for the daughter first.

I got this really nice blue cotton/spandex from Spotlight on clearance last week and the yellow is a thin knit from the Alannah Hill outlet in Melbourne.


She fell inbetween two sizes, the Small and the Medium so I cut a Medium (always easier to take in than try to let out). I like that the seam allowances are 5/8", I always forget with smaller seams and sew them at 5/8" anyway! I had to scoop out the front crotch by a tiny amount (about 1/4") and even though I cut the petite length I also cut another 2" off (She's only 5'2" tall) otherwise the fit is straight out of the envelope. I am yet to see RTW fit her as well, as you can see with her shorts she always has excess at the front so for these to fit so well with virtually no adjustments is amazing!


Very easy construction, I did a stretch stitch on my sewing machine then overlocked the edges. The waistband has the elastic threaded through then zig zagged down to stop it twisting, its something I always do but its the first time I've seen it included in a pattern!

Not much more to say other than its a nice pattern and I'm on the lookout now for good material to make more. She loves them even if I did have to bribe her with a slushy to let me take the photos!

Friday, August 30, 2013

Sew weekly reunion: Colette 1001 Macaron dress


The Facts Fabric: Cotton sateen from Spotlight
Notions: None
Pantone Challenge colors: Emerald, Mykonos Blue and Turbulence
Pattern: Colette Macaron dress with a full circle skirt
Year: 2009
Time to complete: Way too long, about 18hours
First worn: Today
Wear again? When the weather warms up!
Total Cost: $20

I became interested in sewing through sewing blogs and read a lot before I actually dusted off my sewing machine. One of my favourite blogs was the Sew Weekly and it inspired me to sew something every week, regardless of how it turned out. I'm a big believer that the best way to get better at something is to do lots of it!

 
Having said that, this dress gave me the fits! This is the third bodice that's been sewn onto the skirt, the first was a NewLook 6048 (like my copy cat dress). The neckline stretched out and looked awful though and the waistband looked all crooked. So that was unpicked and chucked aside. Next version was the bodice from the Tiramisu dress, but I cut it out of a ponte which didn't stretch enough and fit way too tight. For the third and final version I unpicked the original bodice and managed to cut out the macaron top from it, the back is pieced a bit but otherwise it all worked.

 
I did the knit yoke again, like the last couple of versions (here and here ). The skirt is a basic full skirt with the pockets from Simplicity 2588. I do need to remember next time to add a little bit to the length of the front bodice though, I feel like its riding up slightly.
The colour in the pic underneath is more true as well, I've been on a steep learning curve with taking photos in manual and managed to make all my pics a bit too warm and underexposed. The dress is more muted in real life.


It feels like we have been stuck in winter for months lately, the weather is finally starting to warm up (even though its raining at the moment!), bring on spring so I can wear my dresses!


Wednesday, August 28, 2013

Vogue 1364: ponte jacket


I ordered a couple of patterns in the latest vogue sale and this was one of them. It didn't look that great on the pattern cover but I did like the line drawing and I do wear a couple of waterfall front cardigans a lot to work in the cooler weather.

The pattern does say its a loose fitting jacket and it really is. I cut a size F and graded in at the waist to a size E, which is 3 sizes smaller than I should have cut. I didn't make any bust adjustments and it looks ok, so it is pretty forgiving in the front. Material is a ponte knit from Lincraft

I really, really like the pockets, they are a single pattern piece which is sewn to the front of the jacket, you do see the stitching lines on the front but they sit beautifully flat and are a really neat idea, I will be using it again on casual jackets and I think they would work well on pants too.


I did shorten the length and the sleeves by a couple of inches. The collar was a bit of a pain, it sat beautifully before I did a rolled hem around it but then it just wouldn't sit smooth. I ended up stitching down the collar from shoulder seam to shoulder seam to make it sit properly.


However, I don't like the shape on me. It has no waist definition and I don't think the front drapes as nice as a basic waterfall front cardigan, it looks kind of bunchy where the darts release. The proportions are a bit off too, It needs to be a fair bit shorter I think, but then I would have to cut the pockets in half so this was as short as I could hem it. It was well drafted and sewed up really quick but I can't see myself making another one.

Thursday, August 8, 2013

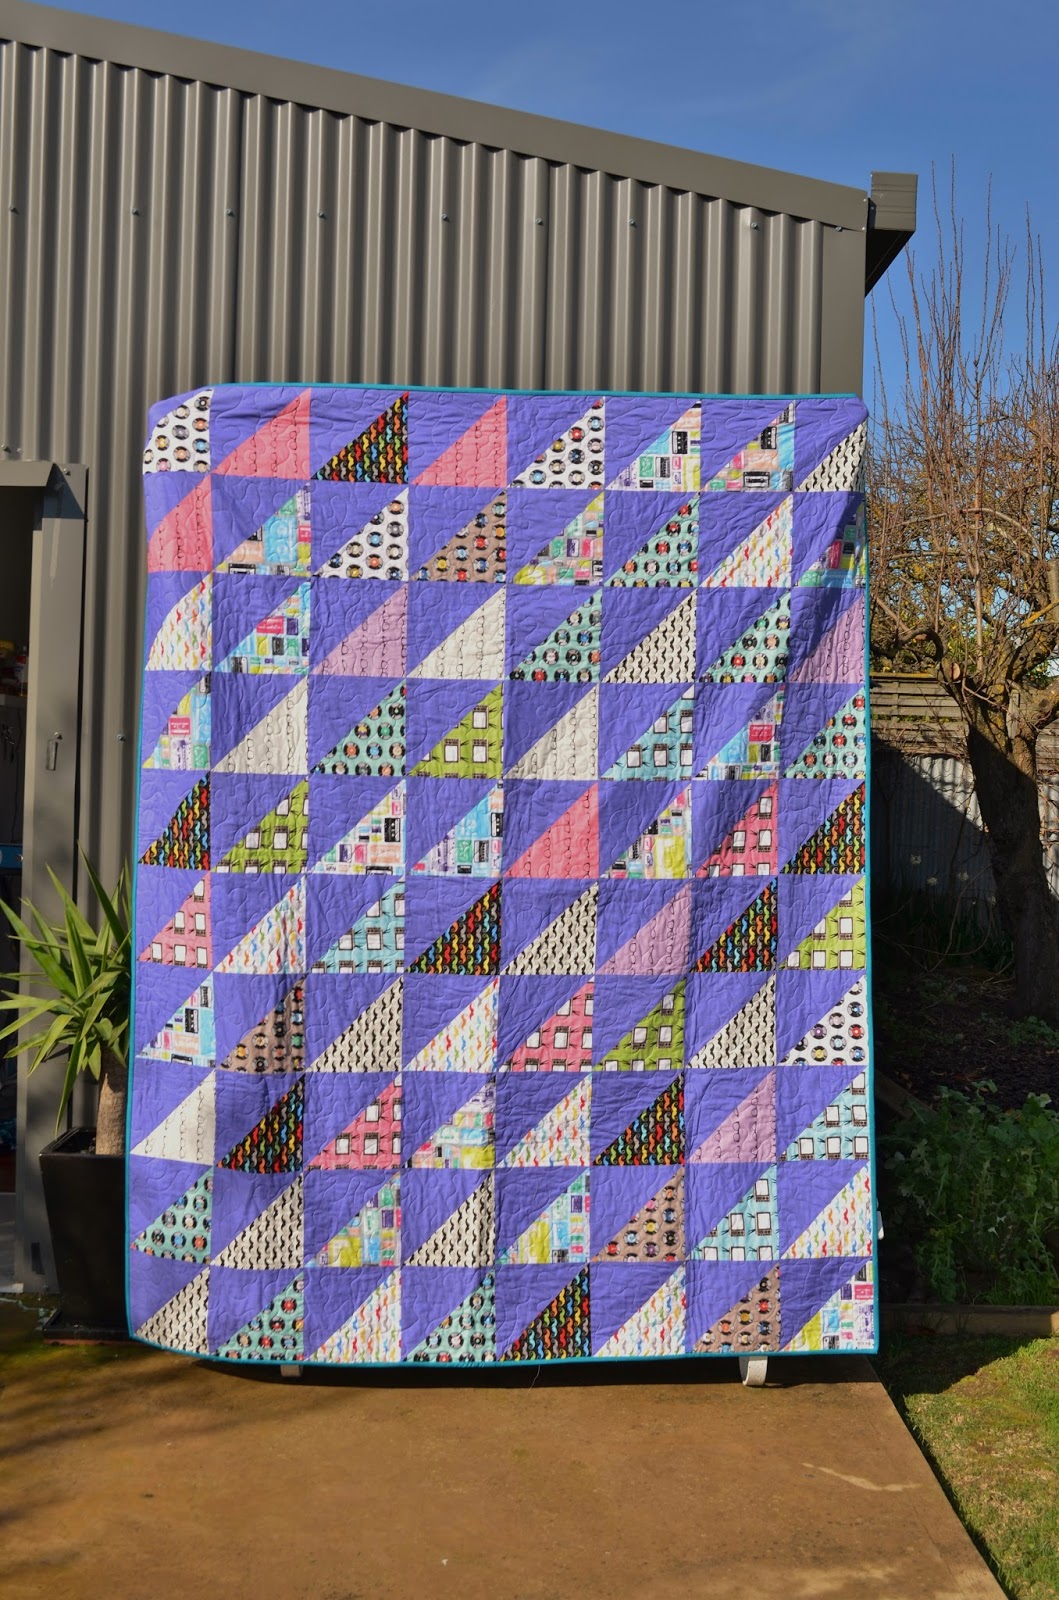
Geekly Chic triangle quilt


I have been hoarding this fabric range for a few months now, its one of my favourites for when I want to go all Gollum by stroking my stash and calling it my pretties.......
I finally caved and decided to make my daughter a quilt. I let her pick the design and the contrasting fabric and binding.
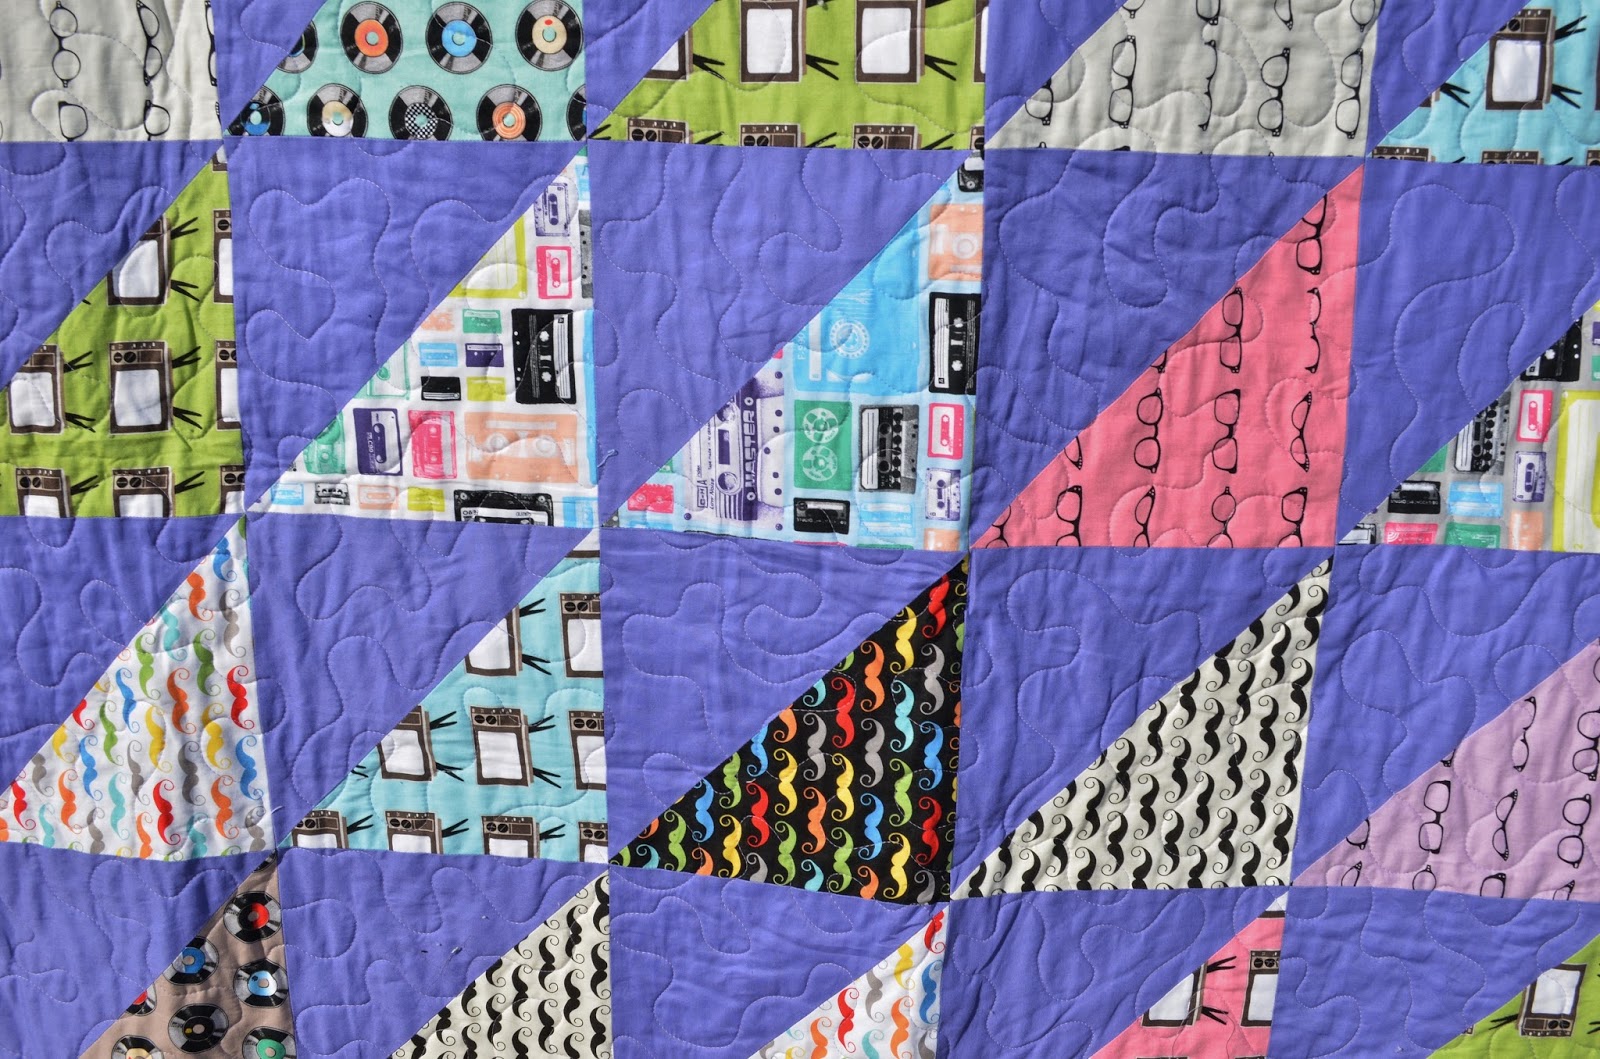
The main are from the Geekly Chic range and I bought them from lilybellafabric.com. The contrast is from Lincraft's quilting cotton, in Lilac and binding is from the stash.

 
It turned out to be a reasonable size quilt, 175cmx220cm. It fits really well on her king-single bed with a decent overhang. I like doing half square triangles, they go together really quickly and you get to see a nice big piece of the fabric. The only downfall of hst is if you are using a directional print which is why I decided to do them facing side to side rather than up and down, makes it a little less obvious that half are facing the opposite direction.
I pieced her name in the back, using the Refrigerator Magnets pattern again but I sized it up by nearly double to get it to fit the size of the back.

 
Its quilted all over in a stipple pattern using polyester thread. I have been having constant trouble with thread breakage, skipped stitches and tension troubles until I switched over from cotton thread. I read a great post about free motion quilting with poly thread and was a revolution, my machine has never run this smooth and its really sped up the process, took about 1.5hrs to quilt this entire quilt! I'm still using cotton thread to piece with so I can iron my seams open without it melting the thread.